Sunday 29 December 2013

Tablet covers

My children were fortunate to have been given tablets for Christmas. Both were the same, along with matching cases.
To tell them apart, and also to provide them with a little more protection, I set out to make them covers.

I used a free tutorial from Create Kids Couture, which offers instructions for cases in several different sizes for different tablets.

My only change was to replace the elastics with cotton/lycra fabric I sewed into a tube. The elastic I had on hand was either too firm or much too narrow.


These work quite well, and my only addition will be to pop a velcro dot on the back of the tablet for added security.


Tuesday 24 December 2013

Simple Skirts

For a number of girly gifts lately, I have made Simple Skirts using the tutorial on the DanaMadeIt blog.
In simple terms, you use the full width of fabric - sew a side seam, hem and casing for elastic. Done!

These are a quick project, and are a nice way to showcase some pretty fabric.


Tuesday 17 December 2013

Teacher gifts - Infinity Scarves

As we reach the end of the school year, I needed to come up with an idea for a teacher gift.

After to-ing and fro-ing on a few ideas, I settled on infinity scarves. I considered doing a lightweight cotton one as we are coming into Summer, but then decided I would go with a wool one and have it as a Winter gift that actually gets used!

I found a fairly straightforward tutorial on the H is for Handmade blog. The only change I made was to make the initial width 20" rather than the suggested 22", and was thus able to get three scarves out of my length of fabric.


I came across a really nice suit weight 100% wool in nuetral tones that seemed to really suit the styles of both teachers I was gifting to.

Modelled by 'Fred the Head'


Wednesday 23 October 2013

Hot Patterns Martini Jacket

I have had the HP Martini Jacket pattern for a while, but was undecided on fabric. I could see this being a really solid piece in my wardrobe.


Well my idea of a neutral colour went out the window when I found 'the' fabric. A gorgeous poly/viscose fabric with a quilted look and a large floral printed on it.
I wasn't thinking of the conundrum of pattern matching and other such trifles - I just had to have it!

I spent a while just staring at the fabric, trying to decide the best way to cut it out, so that the pattern at least looked like I had endevoured to match up some of it. In the end, I only had to re-cut one side front piece that didn't look quite right.


The pattern pieces went together well, and the instructions were one of the earlier Hot Patterns, so more a suggested order of construction and no diagrams. This was generally fine for me, though not necessarily suitable for a beginner.
I only had to refer to a reference book for a little help on the shawl collar as this was not a technique I had come across before. Now that I understand how this is meant to go, the instructions were fine.

I ended up pressing all my seam allowances open, and then binding them with rayon seam binding. I used this tutorial by Laura Mae of the blog, Lilacs and Lace.
The fabric has a spongy texture, so I ended up also topstitching all my seam allowances down after they were bound, and then went mad and also bound all the edges of my facings too. I think it looks really nice, but wow, it took a lot longer!!

I also found the perfect buttons at Made on Marion - thanks Maryanne!


I am so pleased with how the pattern came out, and my fabric choice - my only disappointment was that it is just a tiny bit tight through the shoulders... aaargh!
On the upside, I found more of the fabric in the Fabric Warehouse pop-up sale, so after I have re-made this in the next size up (in different fabric) to check for better fit, I am TOTALLY making this again in this fabric.


Wednesday 16 October 2013

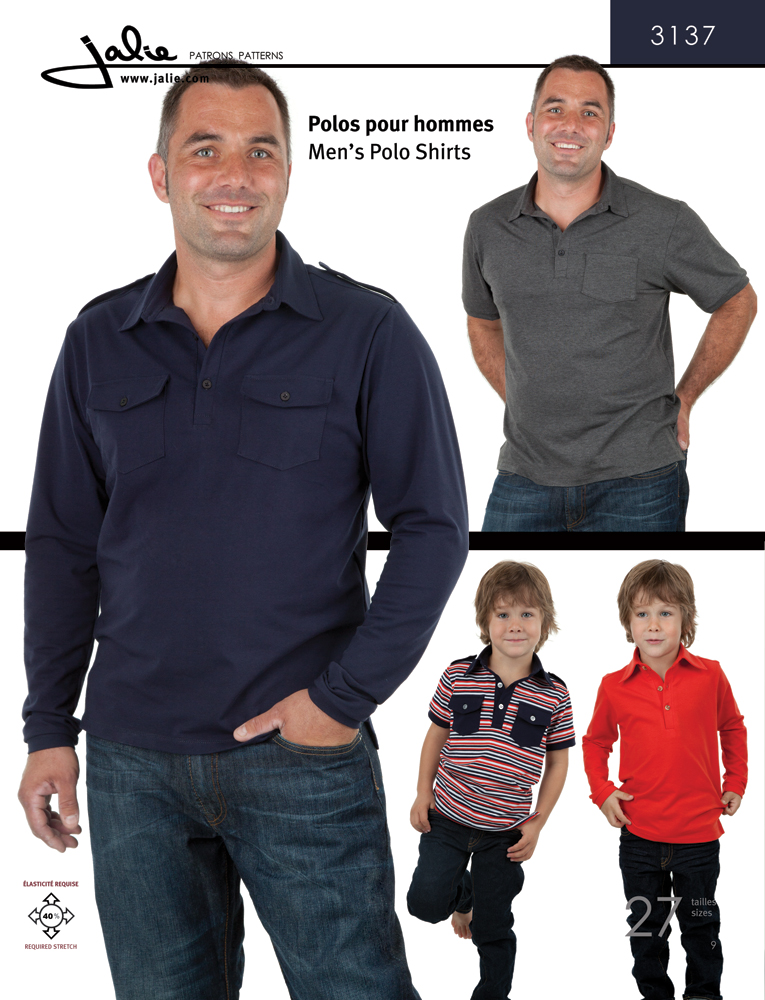
Men's (and Boy's) Rugby Jersey - Jalie 3137

Pattern Description: Polo shirt with standing collar, buttoned placket, shoulder tabs, back yoke and forward shoulder seam, short (A) or long (B) banded sleeve, two chest pockets with flaps and side seam slits.


.

Pattern Sizing: Toddler 2 to Mens 50" chest


Were the instructions easy to follow? Yes, the instructions were excellent - well written with lots of diagrams.


Fabric Used: 100% cotton rugby knit for the shirt body, and cotton ripstop/cotton drill for the collar and front placket. Snaps instead of buttons.


Hubby's jersey - still haven't managed a photo of him wearing it!

Pattern alterations or any design changes you made: 
I changed the collar to a woven fabric to make it look more like a traditional rugby jersey. This worked fine as the rugby knit used for the body does not have much stretch.

Next time, I would make a size or two up for the rugby knit, as it ended up quite slim fitting. My husband was initially a bit worried it was too slim fitting, but decided it was fine after he got some favourable comments when he wore it to work. My son would also prefer his a bit more roomy.

T more than happy to stand around for photos. (and show off matching side seams)

I would also possibly merge the back yoke and back piece into one, as it doesn't provide any shaping.


Would you sew it again? Yes, I will be making this again, as both my husband and son have requested more. I can see this pattern getting a lot of use for both polo tees and more rugby jerseys.


Conclusion: A great TNT pattern at our house full of boys!

Wednesday 9 October 2013

Hot Patterns Weekender Cabana T's

Pattern Description: Super-chic but oh-so-simple T-Shirts are designed for T-Shirt or sweater knits with a little stretch: perfect for mixing prints for a funky look! Relaxed-fit T-Shirts have a very slightly A-line shape, with a scooped neckline. Short-sleeved T-Shirt has center front & back seams; 3/4 sleeved T-Shirt has a bias-cut breast pocket. Both styles feature a bias-cut neckband, deep hems and optional cover-stitch trim.


Pattern Sizing: 6 -26

Did it look like the photo/drawing on the pattern envelope once you were done sewing with it? Yes, I think they looked fairly similar exceptig I left off the pocket.

Were the instructions easy to follow? Yes, the instructions were good with some diagrams.

What did you particularly like or dislike about the pattern? It lends itself to lots of differet looks depending on the knit used.
It is a bit tricky getting the neckband on with the right tension. My first attempt was the most successful, because it was made from a slinky type knit that had plenty of stretch.
My second version was from a terry knit with not a lot of stretch, so the neckband piece was too short.
My third version was from a striped merino jersey. I lengthened the neckband piece slightly, but this ended up being too much and would have probably been fine with the original neckband length.

Fabric Used: A slinky knit, that I've finally got to the end of! 

A black merino terry knit
A striped merino jersey 


Pattern alterations or any design changes you made: My first version was a size 16, as per my measurements. This felt just a bit too big.
For my next two versions I sized down to a 14, which felt like a much better fit to me.

Would you sew it again?  Yes, I've made this three times already, and will definitely make it again.

Conclusion: A good basic tee for my wardrobe.

Wednesday 2 October 2013

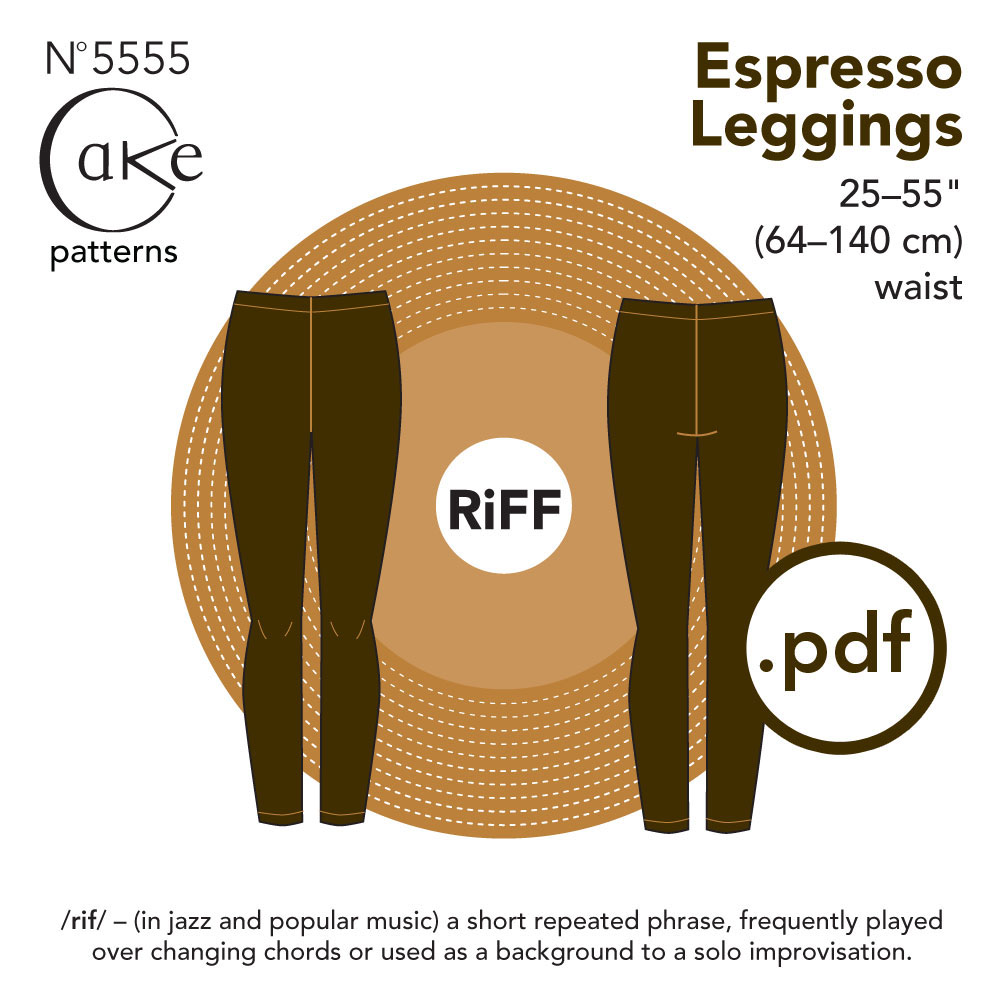
Cake Patterns Espresso Leggings

Pattern Description: Create custom-fit leggings in a flash! The innovative Espresso template from Cake RiFFs makes it simple - just measure, mark, and connect the dots for a pattern that fits just right and sews up quickly. Elastic waistband slips smoothly beneath other layers.


Pattern Sizing: 25 - 55" waist.

Did it look like the drawing on the pattern envelope once you were done sewing with it? Yes, they are a fair representation.

Were the instructions easy to follow? Yes, the instructions both for drafting the pattern to your measurements, and the construction were excellent.

Fabric Used: a slinky type knit 


Pattern alterations or any design changes you made:
none, these are as drafted. Next time, I will lower the waistline a little as I think I erred in my self-measuring.

Would you sew it again? Yes, I will definitely make these again. I love to wear leggings rather than tights under my winter boots, and I can have some fun with some knits.
I think these would also be excellent for custom drafted thermal leggings too.

Conclusion: A quick easy pattern, with awesome results.

Saturday 27 July 2013

Wiksten Tova - round 2

Despite not being entirely happy with the fit of my previous version of this pattern, I have worn it most weeks since it was made. A remake was in order.

After taking my shirt to my last Meet-up group meeting, and getting some advice from my lovely friends, I made the suggested changes and sewed it up again. After a minor brain fart with the sleeves, I re-cut and sewed them.

The fit is now pretty good.

this hem is straight - just would have looked better with an iron!

The changes made;

- an FBA as detailed in my previous post.
- added 2cm right across the front, back and sleeves at high bust height.
- cut the front yoke on the bias for interest.
- added snap closures to the front band.

- after setting in the sleeves with the 2cm added, realised that the angle of the sleeve meant the shirt was mostly unwearable (think straight jacket chic). I ripped them out again, re-jigged the sleeve.
This involved tipping the 2cm gap I had made into nothing at the centre of the sleeve, and then adding the length I has lost at the top of the sleeve cap to the sleeve side seams.

Will add a pic of the altered pattern piece when I get to taking it.

A change I made last time that I have not incorporated, was to add a couple of fisheye darts to the back for some waist shaping. I may still do this yet.

Wednesday 24 July 2013

Made By Rae Parsley Pants

As I've mentioned previously, my older son is small in both height and girth, which makes RTW pants an impossibility.
The current solution to this, is that I make his pants for him.

When Made by Rae released their new pants pattern, I showed it to my son who immediately latched on to the tartan pairs!!


I took myself off to Spotlight to look for some suitable fabric to try the pattern, and found some forest green and oatmeal check on the clearance table - sold!

I sewed them up, and handed them over for a try on and opinion. He liked them, but asked if I could make them warmer. After a bit of thinking, and a dive into my stash, I decided to underline the next pair with flannelette.

This time I took him with me to Spotties to pick his own fabric, and we came awaywith some 'interestinng' choices.

Lazer Beam pants!!

Cartoon pants
He is really pleased with his 'warm' pants, and they are in regular rotation, at least once a week or more often if they go through the wash.

'scuse the wrinkles - I had to spirit these out of the washing basket while he wasn't looking!!
He has a couple more pieces of fabric chosen for more, when I get to it too .....

Saturday 8 June 2013

Indie Pattern Month

Indie Pattern Month is being hosted by Mel of the Curious Kiwi, and Kat of Modern Vintage Cupcakes. Head on over to their blogs to find out more, and join in the fun.


Despite, having quite a substantial pattern stash containing both Big 4 patterns and Independent pattern designers, it is the Indie's I tend to reach for the most. 
Case in point, the last few patterns I have made;

Hot Patterns Cabana T shirt
Hot Patterns Superfantastic Shirt
Made By Rae Parsley Pants 
Colette Laurel
Jalie Mens and Boys Rugby Jerseys
and about a dozen different wallets and bags from Michelle patterns.


On my immediate to-do list (this list is really long, so this is just the highlight reel)

Jalie's .... so may Jalies.
Most of the Hot Patterns catalogue, most notably their pant/trouser patterns ;-)
And these beauties below ...


Decades of Style 1930's Capelet
Decades of Style 1950's Object dArt Dress


Onion Coat with cut on Collar.
If you order your patterns from shopOnion, you can even have the instructions in English!

For even more Independent Pattern Designer inspiration, head over to A Good Wardrobe for an ever expanding list.

Wednesday 1 May 2013

Colette Laurel

Well! After my camera went AWOL for a bit, it has turned up again so I can get on with photographing a bunch of finished projects (not necessarily in the order they were completed, though)

First off, is Colette patterns most recent release, the Laurel shift dress.


I will be the first to admit that when this pattern was released, I was not really very ennthused. I just wasn't convinced this was going to be a good shape for me. After having seen a few iterations made up though, I felt it was at least worth a try.

I chose a cotton poplin that I just loved when I first saw it, but have had sitting in my stash for a bit because the 'right' pattern hadn't presented itself. It is a happy fabric, but not too out there.


I made the pattern up as drafted, except for tracing off the length of the largest size, which gave me about an extra inch to play with. The only other deviation was to machine stitch my sleeve and neck bindings down rather than slipstitch by hand as suggested in the pattern.

This is a really quick sew, particularly as I left out the back zip. I basted the back seam together to check the fit and discovered I could comfortably take it on and off without a zip, so didn't bother!


While this dress is comfortable, and I'm pleased with how it came out, I'm still not sure if this is the right style for me. Time will tell how often this makes it out of my wardrobe.

Final Word: happy enough, but no immediate plans to make it again.

Tuesday 26 March 2013

Birthday Present Sewing

Another one of those things 'they' don't tell you before you have children, is that children will make friends, and get invited to a LOT of birthday parties! And it seems we are in the midst of birthday season.

I am fortunate to have crafty friends who appreciate a good handmade gift, so the search was on for a great idea. I came across this Art-on-the-Go kit, and decided it would be perfect for the varying ages I needed to make gifts for - mostly 3 - 7 year olds.


These are great as they don't use much fabric, so I have been able to make use of my leftover offcuts from previous sewing projects.
I have also been able to match the fabric and colours to the child I have been making them for.


I have so far made at least half a dozen of these, and my own children are making noises that they would like one for themselves.


As well as the examples pictured, there have been art rolls made from denim, shirting stripes, sock monkey print, pinwale cord, and I have used what I had on hand for the batting layer - mostly towelling, polar fleece and flannelette.

Tuesday 12 March 2013

Fabric-a-brac is on

After some concern near the end of last year, Fabric-a-Brac is back in Wellington


Save the date!

Saturday 23 February 2013

Pattern Pyramid Winner

Thanks to everyone who took the time to comment, and have a looksee round my wee corner of the blogsphere. It was also awesome to find some new-to-me bloggers in New Zealand!

While I have seen some really cool prize draws on blogs recently, I am going with the standard fallback of the random number generator. Sooo................... the number that came up was number 7! (sorry, can't figure out how to get the actual number generator to display, so you'll just have to trust me on that!!)

dressesandme
What great patterns! And fantastic to find another new Zealand based blogger like myself! Count me in please!


Congratulations, I've sent you an email to sort out postal addresses and whatnot.


Monday 18 February 2013

Map the Sewists

Found something cool you may want to take part in - Vicki of the blog Another Sewing Scientist, has started a google map, where you can add yourself and find other sewing friends near you too.


View Map the Sewintists in a larger map

Great for coralling new sewing friends for a meetup, or finding who is about in a place you might be travelling to?!

See her post here to see all the details.

Friday 15 February 2013

Pattern Pyramid Giveaway!

Just before Christmas I was fortunate enough to win a Pattern Pyramid giveaway from Imogheena at Tropical Threads. What with the busyness of Christmas and such, a parcel arrived for me this week.

After some deliberation, I chose to keep a Burda Easy magazine with some really interesting looking patterns. The magazine is entirely in German, but I have a friend who speaks German who has offered to help out if the Google translate is a bit bewildering!


So, to my giveaway - these four are the remaining patterns from the original package.
BurdaStyle peplum blouse; Simplicity 5931 - size 14.
McCalls 2085 - size12,14,16; New Look 6773 - size 6-16.

We have the very last label that Karen had made up whe she originally started the Pattern Pyramid.


Because I chose a Burda magazine with several great patterns, I have added a few more patterns of my own to give the next winner a few extra options.
Simplicity 8186 - size 14; Style 1809 - size 6-18.
Simplicity 6896 - size12.


Below are the original rules set out by Karen of 'Did You Make That?'

I’ll add a request: I don’t have many readers on this blog, so if you guys could spread the word, that would be lovely. The more the merrier!

From 'Did You Make That?’s blog post:
THE RULES

  • Anyone, anywhere can enter the giveaway by posting a comment below by midnight NZ time Friday 22 February BUT you must have an active blog. (Reasons to become obvious.)
  • I will post the above selection of patterns to the winner, along with the final hand woven label to be sewn into anything made from one of these patterns.
  • The winner will pick one pattern to keep for themselves, then host their own giveaway. They will randomly select a winner, post the remaining patterns to that Person C. Person C will pick a pattern for themselves, host their own giveaway and post the remaining patterns to the winner, Person D. Person D will…You get the idea! 

I’m really keen to see how far and wide we can spread the pattern love and I’m intrigued to see who ends up with what.

THE SMALL PRINT

  • If you’re a winner, I would love it if you could make a small contribution to The Brooke. This is a charity close to the heart of Catherine, who so generously provided these patterns.

Obviously, I’m operating on a huge level of trust – but I totally trust my readers. All I ask of participants is to engage in a timely fashion, launching their own giveaways soon after receiving a parcel. I also ask that you be happy to post patterns worldwide – we really want to spread the love! 
Once I send the patterns out, I’m not going to attempt to moderate further giveaways, but I’m curious to see how long this takes until the final patterns find loving homes. So please contact me with details of your win and where you live – I suspect another world map is essential! (Remember the World Map of Snoods?)

Finally, if you’re taking part or just want to spread the love, please feel free to add the below button to your blog’s sidebar. Let the fun commence!

Tuesday 29 January 2013

Woodland Stroll Cape

When the new Woodland Stroll cape pattern was released by Liesl of Oliver and S recently, I thought it would make a great topper for our temperate but windy city!


It doesn't take a lot of fabric, and I was sure I would have something available to try it out with stash fabric.
For the shell, I had some eggplant coloured boiled wool/rayon. This is lovely and soft, and sewed up beautifully.

This will look much better when I wear it with a scarf and such!

For the lining, I selected a silk satin that I purchased because I loved the vibrancy of it - unfortunately it was still languishing in my stash because I just couldn't imagine wearing anything made from it!


Thankfully, it looks awesome as the lining in my cape, and will make me smile whenever I wear it.

For the fastenings, I used tack buttons (like on your jeans). I wanted something a little quieter, because I have some great scarves, and with the peeks of the lining, I didn't want them to compete. Obviously though, I can change them for something brighter if I change my mind!


As with all Oliver and S patterns, the instructions are superb with helpful diagrams along with the well written instructions. My only deviation from the instructions as written was to leave the opening for turning in the back neckline rather than in the lining. I was a bit concerned pulling the entire shell through a gap in the lining would shred the seam allowances on the silk. 
They provide the suggestion/option to edge stitch the entire cape, which I did do because the boiled wool was quite puffy and the edge stitching gave it a slightly crisper finish.

This went together quite quickly, with only three pattern pieces - in fact I think it took longer to cut out and interface the pieces than it did to actually sew up!

I can see myself wearing this a lot on windy or cooler days, when I often need to wear a little something extra, but not necessarily a coat.